Tetra
Housing and Olympus C3030Z
2/27/00
- Preliminary posting. I'd appreciate feedback if anything I say is just
the result of my own misunderstanding! --Dave Rossum
NOTE:
In this review, I use color to indicate my ratings: BLUE
indicates outstanding performance in an important feature, GREEN
indicates a job well done, and RED
indicates need for concern. Headings in BLACK
indicate either that the feature is relatively unimportant or that it's
undistinguished in execution. Text in orange
indicates an important tip or caution. If my rating of the importance of certain
features doesn't seem sensible to
you, consider my write-up on thinking digitally.
The Tetra
Housing
 |
|
Size
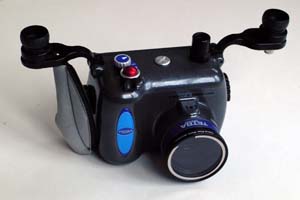
and Shape - I love the look and feel of the Tetra. It's small
enough that it doesn't dominate your dive and so light it's no hassle to
carry. The weight including camera is only 3 1/4 pounds. It wraps
efficiently around the camera with no wasted space. |
Buoyancy
- The Tetra is very close to neutral, slightly negative in salt water.
With two SB-105's attached it's still a little negative. I've never had
any fatigue while carrying it underwater.
 |
|
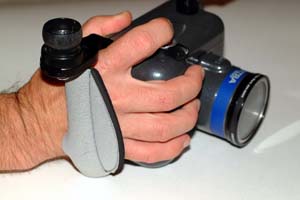
Handle
- The Tetra's neat hand strap feels good and provides a firm grip for
carrying. But the housing adds enough bulk to the camera that I'm unable
to easily work any of the controls one- handed. The shutter and zoom
controls become very difficult to use. Often I feel I need a better grip
to control the camera while shooting. I'm considering adding a
"pistol grip" style handle to the left hand side for stability.
I also wonder if the Tetra hand grip might be even more problematical for a
leftie. |
Attachment
Mounts - The Tetra has three threaded holes on the housing
bottom. Two 10-32 accessory mount holes are useful for attaching a tray,
which nicely tightens against four rubber feet. A 1/4-20 hole is designed for
tripod mount. Atop the lens extension is a pointer light mount which accommodates
the smaller "infinity arm" nicely. Two optional wings at the top
serve as strobe arm mounts. Everything is tightly and effectively
positioned.
Strobe
Ports - On top of the Tetra housing are two optional bulkhead ports
which fit strobe connectors. The leftmost allows you to neatly string your
strobe cable to the left side strobe arm. The right side port requires the
cable to dangle over the shutter on its way to the right strobe arm, a little
messy. The real problem is that the C3030 uses a proprietary method of
TTL strobe control, so the camera's TTL features can't be used. In my
opinion this is one of the major drawbacks of the Tetra/C3030 system. For
more information, see my write-up on the Olympus
TTL details and on thinking digitally.
Camera
Mount - The Olympus camera is mounted in the Tetra housing in a
simple "press in" mounting. A foam rubber ring around the
C3030's lens acts to position the front of the camera against left-right and
up-down motion. If you're careless, you can insert the camera into the housing
pushing the foam ring in front of the lens, which prevents the camera from
operating. I always check. Four plastic feet press against the front
of the C3030 to position the lens area front-back. Foam around the view
port presses the camera against these feet. The right hand side of the
camera is positioned by the cup which mates with the mode dial. All this
makes for simple assembly, but leaves some sloppy tolerances. For my first
dozen dives, I noticed the shutter speed in manual mode would sometimes randomly
increase. Then one dive the camera failed to operate properly because the
top "jog dial" button was continuously pressed. I now carefully check the camera positioning each time I open the back to make sure
the top jog dial button has enough free play so a little pressure won't engage
it. Since adding this caution to my checklist I've experienced no further
problems on dives.
Removable
Back - The Tetra housing back has the same rotary latches and double
O-ring seals as other Light and Motion products. It's simple, elegant and
foolproof.
View
Port - The view port is tight against the C3030's view screen, and
gives a clear and full view.
LCD
Display View - There isn't any. If you want to see whether or
not you're in macro mode, what flash mode is set, and what resolution you're
shooting, you need to press buttons to cause this info to appear on the rear
view port. That's only slightly annoying.
Interchangeable
Lens Ports - The Tetra housing supports three lenses: a flat
port, a wide angle port, and an macro port. Changing the lenses is simple
and foolproof. They're protected by double O-rings.
The Tetra
Controls
 |
|
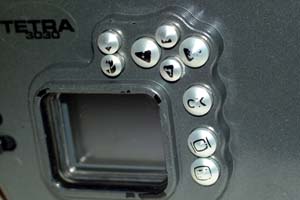
Markings
- The Tetra mode dial is clearly marked with a durable plastic insert with an
arrow, and a plastic sticker around the knob with labels indicating the
positions and functions. The rear buttons are labeled with icons on the
buttons, and these began to wear off during the first dive. It may be hard
to remember the functions at 100 feet when the markings are illegible, which
will be soon. Fortunately, you'll seldom need to remember much. |
 |
|
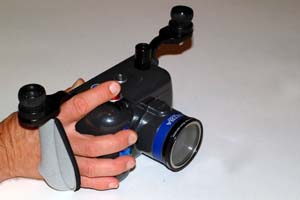
Shutter
- The Tetra shutter might work if your hands are large and
strong. Mine aren’t. When
I first held the housing in the shop, the shutter button seemed stiff and
awkward under my extended index finger (see photo at left). The problem was even more
severe during the first dive. I was
unable to fully depress the shutter without twisting the camera, altering the framing of the subject.
It was virtually impossible to half-depress the shutter reliably, a skill
that is vital to minimize the effects of autofocus lag. |
 |
|
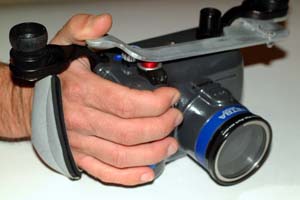
A hacksaw, a drill, a file and some 1/8” aluminum stock
were all it took to kluge together a remedy (shown at left).
The
plate is shaped to screw onto the bottom of the left-hand flash mount and extend
across the top of the camera just above the shutter button.
A bend brings the tab at the plate’s right hand end into convenient
thumb range. The squeezing pressure
between the top of my index finger, which sits below the right hand flash mount
in the handgrip, and my thumb, allows for precise shutter control, and makes it
possible (but not easy) to gauge when the shutter is half-depressed. I may
design a "Mark II" shutter modification to address this. |
Zoom
- Located in front of the shutter, the Tetra's zoom control is also virtually
impossible to use effectively. The zoom on the C3030 itself is marginal. Rather than a pressure sensitive rate, the lever just runs the zoom
motor at a constant and rather fast rate either in or out. Momentary
pushes are possible when the camera isn't in the housing, but even then the
results are inconsistent steps in zoom. The Tetra housing adds substantial
resistance to the control, enough to completely eliminate it's spring return to
center. This, combined with its awkward position, makes it almost
impossible to seek a precise degree of zoom underwater. Additionally, if
you ever fail to manually return the control to the center detent, some (but not
all!) of the camera controls, including the shutter, cease to operate.
There's no indication of the problem in the view port, so it can be very
frustrating when this occurs.
Jog
Dial - In vivid contrast to the zoom and shutter, the four jog dial
buttons are wonderful! They're just separated enough that you don't press
more than one at once, even with gloves in cold water.
Flash
and Macro - These buttons are just a bit too close together.
With my gloves on, I press them both when I plan to just hit one. In warm
water they work fine.
OK,
Monitor, and Menu - These buttons are large enough that they work
just fine.
The
Olympus C3030
Note - There are other better
reviews of the C3030 available elsewhere online, such as the one by Phil Askey
in Digital Photography
Review.
My comments will focus primarily on the C3030 as it's used underwater in the
Tetra housing. I'll make a few topside comments about the camera though,
since most photographers will use the camera in this way as well.
General
Size
and Shape - I like the basic feel of the C3030. It fits well in
my hand, and without the bulk of the Tetra housing my fingers conveniently
manipulate the shutter and zoom controls.
Media
- Olympus digital cameras use "Smart Media," which in my opinion would
be more aptly named "dumb media." (See my write up on SmartMedia
vs. Compact Flash.) The big problem is that the C3030 is at present
limited to 64MB of storage, which I see as a bare minimum. Delkin Devices,
makers of the first shipping 128MB SmartMedia card, has told me that the C3030 will not work with 128MB cards.
On the other hand, Olympus is now saying that it will! I should hear from
a friend who's trying one by the end of the first week in March. While 81 "HQ" images may seem like a lot, it's
not if you use my recommended u/w digital photo techniques.
Battery
Life - The C3030's battery life seems entirely adequate for the
longest (2 hour) dive. I exclusively use 1600+ mAh NiMH batteries.
My battery life test yielded almost two hours of continuous focus power-on shooting and a
150 shots on a single charge with well used, 1500 mAH NiMHs. I
recommend you replace both memory module and batteries between each dive.
Sleep
Mode - After two minutes of idle time, the C3030 enters a "sleep
mode." Pressing any button (I usually press the OK button) wakes it
up and brings it back to its previous ready state. While this may extend
the battery life, the feature is quite annoying underwater. On numerous
occasions I've been ready to take a fine initial shot, only to have
the camera sleep as I'm framing the subject. It takes about 3 seconds to
wake up, just long enough for my subject to swim away. Since the batteries
will last a full dive without sleep, the "feature" gives me no
advantage. Contrast this with the Nikon CP950 and 990, which allow you to
program the idle time to sleep mode to as long as 30 minutes.
The sleep mode seems to
consume almost no power. Since the C3030 forgets its setting when powered
off, it makes sense to set everything up topside, allow the camera to go into
sleep mode, and wake it up after you're underwater.
Amnesia
- Or I suppose you could call the C3030 the camera with Alzheimer's. The
designers, in a poorly thought out attempt to save cost, did away with the
back-up battery for the clock in the C3030. If you leave the camera
without charged batteries for somewhere around an hour, it forgets
everything! This can be extremely annoying, particularly when you don't
realize that your settings are all screwed up until you're underwater.
Shutter Lag - This is a
complex subject, so please read my full write-up on causes of shutter
lag.
To summarize, using half-depression of the shutter, you'll get about 300 msec of
lag. Raw shutter depression will give you about a second. If you
accidentally get into red-eye mode, you'll see 2.5 seconds. These aren't
good, but they're typical of today's digital cameras.
Shooting
Rate - Digital cameras are limited in the rate at which you can
shoot. The shot rate, in pictures per minute, depends both on the shutter
lag (when severe) and the rate at which the camera can process and store
pictures. For the C3030 I shot in continuous autofocus, flash off
(external flash), manual exposure mode. I was able to achieve about 24
shots per minute.
The LCD
Viewfinder
|
|
|
Remaining
Shots - In the lower right corner of the LCD, the memory remaining on
the card, in shots, is displayed. With an empty 64MB card, you'll see 81
available if you shoot (as I do) in HQ mode. This is a somewhat
pessimistic estimate; you'll get closer to 100 shots. There's no display
of the actual shots taken, but there's no need to know this. |
|
|
|
Buffer
Indicator - A black bar in the lower left of the LCD viewfinder indicates in green how much information is awaiting transfer from the camera to
the memory module. This is important only when you're shooting pictures at
the maximum rate, and want to know how much longer you can keep it up before the
camera's internal buffer fills and stops you from shooting. I've never
come close to filling it. |
|
|
|
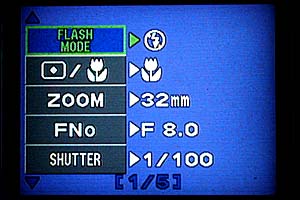
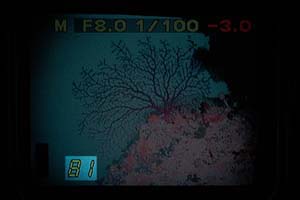
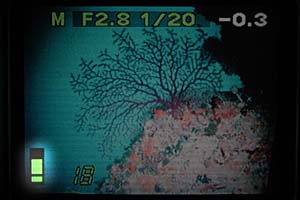
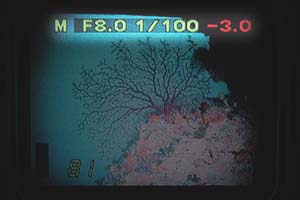
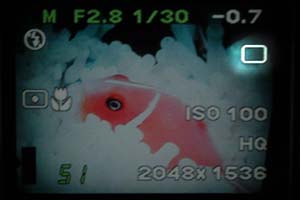
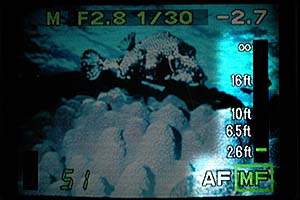
Mode
and Settings - Across the top of the LCD is the mode (I generally
shoot in M for manual), the f-stop, the shutter speed, and the exposure
value. In manual mode, you use the jog dial buttons to adjust f-stop and
shutter speed, and the light meter tells you how many stops under or overexposed
the natural light exposure will be. This works very well.
|
In shutter or aperture
priority modes, the jog dial allows you to adjust the priority setting and an
exposure compensation value in f-stops. The automatically adjusted setting
is displayed. For example, in A (for aperture) mode, the jog dial adjusts
the f-stop, and the camera decides and adjusts the shutter speed.
The only problem with this
system is that it takes six button presses to change between modes.
|
|
|
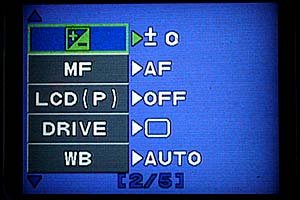
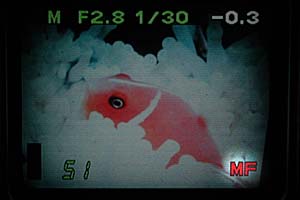
Manual
Focus Indicator - If the camera is in manual focus, "MF"
appears in red in the lower right hand corner of the LCD viewfinder. |
Intermittently
Displayed Items - The remaining items are shown for only a few
seconds when certain buttons are pressed. The simplest way to get this
display is to press the menu button twice.
|
|
|
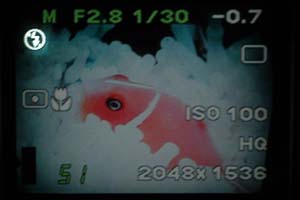
Flash Mode
Icon - About 1/4 of the way down the left side of the LCD, the flash
mode icon is briefly displayed. There are four modes, none (automatic
flash), eyeball (red-eye flash), lightning bolt (flash always on) and lightning
bolt surrounded by circle (flash off). In the Tetra housing, you always
want the flash off. |
|
|
|
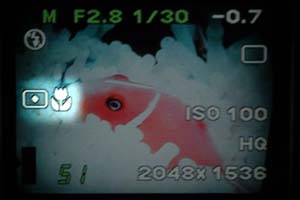
Focus/Metering
Mode Icons - About half way down the left side of the LCD, the focus
and metering mode icons are briefly displayed. There are two independent
modes, normal/macro range and normal/spot meter weighting. The macro mode
is indicated by a flower, the spot metering mode by a square with a dot in the
center. Lack of these icons indicates normal mode. All these modes
can be useful underwater; I generally default to macro range and normal
metering. |
|
|
|
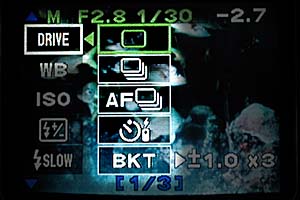
"Drive"
Icon - About 1/4 of the way down the right hand side of the LCD, the
"drive" icon is briefly displayed. There are five
"drive" settings. A single rectangle indicates single shot
mode. A stack of rectangles indicates "sequence" mode, and with
an AF next to it "AF sequence" mode. A clock indicates
timer/remote mode, and the letters BKT indicate automatic bracket mode.
Single is the usual setting, but sequence and AF sequence are useful. |
|
|
|
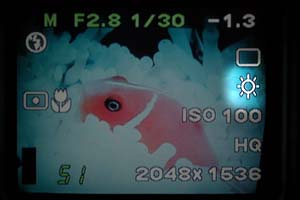
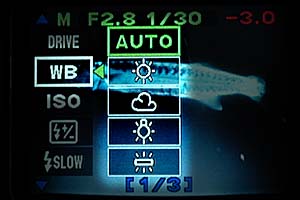
White
Balance Icon - Just below the drive icon on the right hand side of
the LCD, the white balance icon is briefly displayed. There are five white
balance settings. No indicator is the default auto setting. The sun,
cloud, and tungsten light bulb icons are easily recognized, the rectangle with
extending lines is a fluorescent bulb. I generally leave the setting at
"auto." |
|

|
|
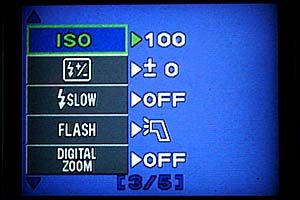
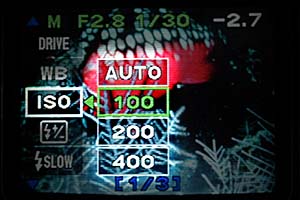
ISO
Setting - Halfway down the right side of the LCD the ISO rating (100,
200, or 400) is indicated. Generally you'll want ISO 100 to get the lowest
noise and best definition, but you may want
to choose 200 or 400 for low light conditions. |
|
|
|
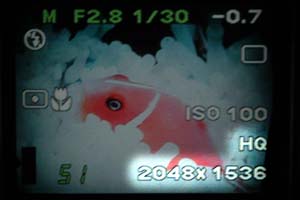
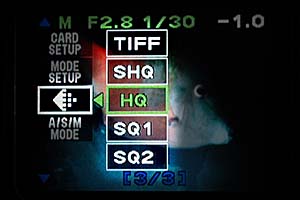
Resolution
Setting - At the bottom of the right side of the LCD, the resolution
is displayed on two lines. The first line indicates the compression mode,
with choices of TIFF, SHQ, HQ, SQ1 and SQ2. The second indicates the image
size in pixels. I generally shoot HQ 2048x1536. |
|
|
|
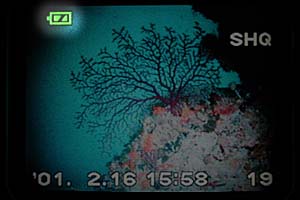
Remaining
Battery Indication - While in "record mode" there's no LCD
indication of a low battery. You can only see the battery status on the
LCD by switching to "play" mode. This can be easily done by
pressing the monitor button twice. The battery status icon is then briefly
indicated at the upper left. A green full battery indicates the battery
isn't dead yet. Unfortunately, you get almost no warning of low batteries
when using NiMH cells. |
The Buttons
and Record Mode Operations
I'll assume you're familiar
enough with the C3030 that you understand the power/mode dial, the
shutter and the zoom. The descriptions below tell how the various buttons
work primarily in "Record Mode" (when you're taking pictures). I
assume you're using the camera in "A/S/M" Record Mode, as the "P"
Record Mode is pretty much useless in the Tetra.
Flash Mode
Button - Indicated by a lightning bolt, this button cycles through
the four flash modes (normal, red-eye, on, and off). In the Tetra, the
only useful mode is "off". In play mode (reviewing
photos) this button doubles as the delete function. Pressing it gives a
choice of deleting (press OK) or not (press the flash mode button again).
Focus/Metering
Mode Button - Indicated by a flower, this button cycles through the
focus/metering modes. There are two independent modes, normal/macro range
and normal/spot meter weighting, giving four combinations. Spot meter
weighting causes the camera's exposure meter to evaluate the light only in the
very center of the screen, which is useful when you want to light a particular
subject properly. Macro mode enables a wide range of focus. It's
worth noting that macro mode does not preclude distance
shooting, though the
auto-focus can get a little slower. I generally leave the camera in macro
mode, normal weighting.
Jog/Shuttle
Dial and Exposure Control - These four buttons are used for a variety
of functions. In Record Mode, they are used to adjust the
exposure. They can also be used for manual focus adjustment. In the
Menu Mode, they navigate through the selections. In Play Mode, they skip
through the stored photos, and serve to position the magnifier when zooming.
When the camera is in Manual
(M) Record Mode, the left and right jog buttons increase and decrease the f-stop
respectively. The top and bottom buttons increase and decrease the shutter
speed. The 1/3 stop increments are just right. The range on the
shutter speed is fine (down to 1/800 sec), but f-stop values beyond f/11 would
be extremely useful.
In the Aperture Priority (A)
Record Mode, the top and bottom buttons control the aperture, while the left and
right control exposure value deviation from ideal. Similarly in Shutter
Priority (S) Record Mode the top and bottom control shutter speed and left and
right exposure value deviation. The only problem with this system is
that it takes six button presses to change among the A,
S, and M modes. I
generally leave the camera in Manual Mode.
|
|
|
Manual
Focus/OK Button - Indicated by the letters "OK," this button
is used to confirm an operation in menu mode, and activates manual focus in
Record Mode. When pressed during Record Mode, a distance display appears
on the right side of the LCD viewfinder, along with the letters "AF" and
"MF" at its
bottom. The active mode, automatic (AF) or manual (MF) focus, is indicated
in green, and can be toggled by either the left or right jog dial buttons.
If manual focus is selected, the top and bottom jog dial buttons are used to
adjust the focus distance. Pressing either activates a momentary
magnification on the LCD viewfinder so the focus can be more accurately
judged. The distance is displayed in two scales; one spans from infinity
to 2.6 feet, the other from 31 inches to 8 inches. The scale automatically
changes as the manual focus is adjusted. Pressing the OK button exits the
distance display mode, leaving the letters "MF" displayed in red at the lower left
if the camera remains in Manual Focus Mode. Photos can be taken while in
the distance display mode, but the exposure cannot be adjusted.
It's worth noting that the
distance display does not indicate the autofocus distance, nor is there any way
to use autofocus to help determine the manual setting. However, the manual
distance is remembered even while in autofocus, so you can quickly return to a
previously set distance (unless the power is switched off). This is useful
for macro shooting. It's also worth noting that you don't have to be in
macro mode to focus as near as eight inches.
|
Monitor
Button - Indicated by a rounded rectangle with vertical bars left and
right, the monitor button turns on and off the LCD viewfinder. Since the
viewfinder is the only indicator for the Tetra, you'll always want it on.
Note that it takes about two seconds to turn it back on if you accidentally turn
it off.
Pressing the monitor button
twice in quick succession while in Record Mode transfers you quickly to Play
Mode, so you can review your shots. It takes about two seconds before the
most recent shot is displayed. Pressing the monitor button again, or
pressing the shutter either halfway or entirely will return you to record mode
in about 1.5 seconds. I generally wait to review my shots topside (or
during my safety stop), but this feature can be quite useful if you want to
critically examine a shot underwater.
Menu
Button - A rounded rectangle containing three horizontal lines
indicates the button that activates the programming menus of the C3030.
Pressing the button a second time exits Menu Mode and cancels any changes you
have made!
The Menus
and Settings
When you've pressed the menu
button, a column of setting icons appears along the left side of the LCD
viewfinder, with their corresponding value icons to their right. You
navigate through the settings using the top and bottom jog dial buttons, and
select a value using the right jog dial button. Once you've changed a
value, you can take a picture using that setting immediately. You can also
confirm the setting by pressing OK or the left jog dial button; either of these
actions takes you back to the setting icon column. If you want the change
you make to remain active when you exit menu mode, you must press OK. If
instead you press the menu button, your selection will be deactivated.
This can be confusing, so it's worthwhile playing with menus for a while to make
sure you understand these rules.
Here's a brief summary of
the menus and settings:
|
|
|
DRIVE
- There are five
"drive" settings. A single rounded rectangle indicates single shot
mode, in which you press the shutter and the camera takes a single picture. A stack of rectangles indicates "sequence" mode, and with
an AF next to it "AF sequence" mode. In these modes, the camera
takes up to five rapid-fire pictures if you hold down the shutter, and you can
use your external flash if it's set to a low enough power setting. In the
AF mode, the camera re-focuses between shots. A clock indicates
timer/remote mode (pretty useless underwater), and the letters BKT indicate automatic bracket
mode, which also has little underwater use. |
|
|
|
WB
- There are five white balance settings. Auto attempts to figure out the
balance from the scene colors and compensate accordingly. The sun, cloud,
and tungsten light bulb icons are self-explanatory. The bottom icon is a fluorescent
light bulb. My philosophy on color balance is to leave it on auto and fix
it in Photoshop. |
|
|
|
ISO
- You can select ISO speeds of 100, 200 or 400. The slower the speed, the
less noisy the CCD image. Generally you'll want to shoot at 100, but you
may sometimes find conditions where the added speed is worth the noise of higher
settings. A setting of AUTO which chooses an ISO setting based on lighting
conditions is only available in the P Record Mode, hence not useful underwater. |
TTL Flash
Exposure Compensation - A rectangle containing a lightning flash and
+/- indicates the TTL flash exposure compensation setting. Since TTL flash
doesn't work with the Tetra, you can ignore this one.
|
|
|
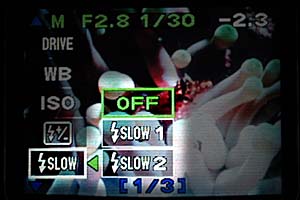
Slow
Shutter with Flash - The lightning bolt icon next to the word SLOW
indicates the slow shutter speed flash setting. A setting of OFF prevents
the shutter speed from going below 1/30 second, SLOW 1 causes the flash to
fire at the beginning of a slow shutter speed, and SLOW 2 causes it to flash at
the end. OFF is the only useful setting underwater. |
|
|
|
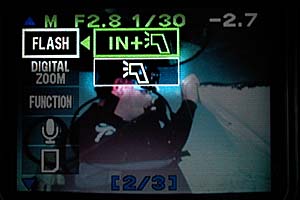
Flash
Int/Ext Mode - The word FLASH indicates the flash internal/external
mode setting. Either my camera is broken, or this setting doesn't do
anything useful. The only way I get what you want for the Tetra housing,
which is internal flash OFF, external flash firing, is to use the flash mode
button to set the flash mode to OFF. The setting of this internal/external
mode doesn't seem to matter. In particular, even when I select external
only (picture of external flash unit) the internal flash still fires. |
Digital
Zoom Enable - The words DIGITAL ZOOM indicates the digital zoom
enable setting. In my opinion, there's no point to digital zoom since you
can crop the photo using Photoshop under better conditions. I leave this
set to OFF.
|
|
|
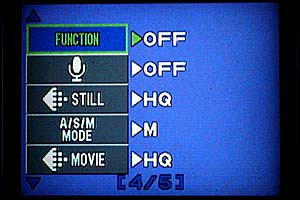
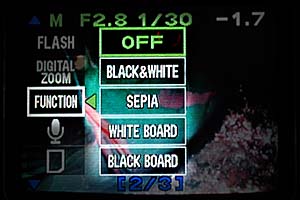
Image
Processing Functions - The word FUNCTION indicates the image
processing function setting. OFF indicates no special processing.
BLACK & WHITE causes the image to be captured in black and white.
SEPIA gives a monochrome picture with a sepia tone. WHITE BOARD and BLACK
BOARD are high contrast settings useful for capturing black on white or white on
black text respectively. OFF is the only useful setting; black and white
or sepia effects are easily achieved from a color image in Photoshop. |
Record
Enable - A picture of a microphone indicates the record enable
setting. When ON, about four seconds of sound are recorded with each
picture. Not useful underwater.
|
|
|
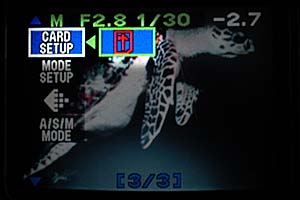
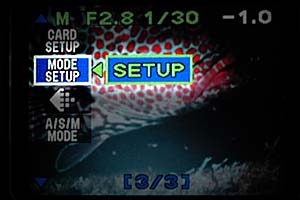
Memory
Card Format - The words CARD SETUP indicate the memory card format
operation. Selecting this operation, then pressing OK twice causes the
memory card to be re-formatted. This is the easy way to erase all images
on the card. Be careful, unlike many cameras you can
erase everything just by pressing OK with no other buttons. |
|
|
|
Mode
Setup - The words MODE SETUP indicate a sub-menu which allows a
number of settings to be adjusted. Press OK to enter this important
submenu containing the following settings: |
|
|
|
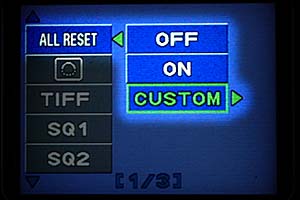
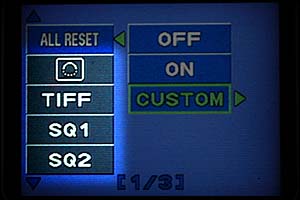
MS
- Initial Settings - The words ALL RESET indicate the initial
settings menu, which can be set to OFF, ON, or CUSTOM. ON causes the
camera to reset the settings listed below to their default values, which is
generally annoying. OFF causes the camera to remember these settings when
you cycle power, which is more useful. CUSTOM allows you to define the
power-up status, which I find most useful. The settings are: |
| Setting |
Default |
I Recommend |
Comment |
| FLASH MODE |
Auto |
OFF |
Any other setting causes internal flash to fire |
| Focus/Metering |
OFF |
Macro/Normal |
Gives full focus range at cost of slower autofocus |
| Zoom |
32mm |
Your choice |
Starting point for zoom |
| F-Number |
F/2.8 |
F8.0 |
Or chose your most common setting |
| Shutter Speed |
1/4 sec |
1/100 |
Or chose your most common setting |
| Exposure Comp |
Zero |
Zero |
|
| Focus |
Autofocus |
Autofocus |
|
| LCD in P mode |
OFF |
OFF |
So I can tell if I'm accidentally in P mode |
| "Drive" |
Single |
Single |
|
| White Balance |
Auto |
Auto |
|
| ISO |
Auto |
100 |
Optimum quality |
| Flash Expos'r Cmp |
Zero |
Zero |
Doesn't matter since TTL doesn't work |
| Flash Slow Mode |
OFF |
OFF |
|
| FLASH |
INT+EXT |
EXT ONLY |
Doesn't seem to work, but this is what you want |
| Digital Zoom |
OFF |
OFF |
Use Photoshop instead |
| Function |
OFF |
OFF |
|
| Record Audio |
OFF |
OFF |
|
| Still Quality |
HQ |
HQ |
Optimum compromise btwn memory and quality |
| A/S/M Mode |
A |
M |
Full manual allows both shutter and aperture control |
| Movie Quality |
HQ |
HQ |
Don't care, not useful underwater |
|
|
|
MS
- Image Sharpening - A circle solid on top and dotted on the bottom
indicate the image sharpening setting, which can be HARD, NORMAL, or SOFT.
It's not clear from what Olympus says whether SOFT gives a blurred image or just zero sharpening.
In general, I believe in doing all the image processing on my computer, but I
opt for NORMAL here in the absence of an explicit "NONE" setting.
MS
- TIFF Resolution - The word TIFF indicates the TIFF resolution
setting, which has five choices. I recommend you don't use TIFF format.
MS
- SQ1 Resolution - The word SQ1 indicates the SQ1 resolution setting,
which has a three choices. I recommend you don't use SQ format.
MS
- SQ2 Resolution - The word SQ2 indicates the SQ2 resolution setting,
which has a three choices. I recommend you don't use SQ format.
|
|
|
|
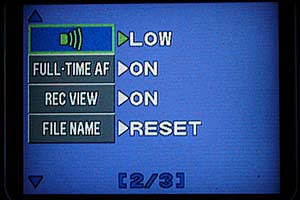
MS
- Beep Volume - A speaker radiating sound waves indicates the beep
volume setting, which can be HIGH, LOW, or OFF. While you don't hear the
beep underwater, I recommend the LOW setting so you can hear the button acknowledgement
when the camera is out of the housing.
MS
- Continuous Autofocus - The words FULL-TIME AF indicates the
continuous autofocus enable, which I recommend you enable by choosing ON.
MS
- Record View - The words REC VIEW indicates the record view enable,
which has three settings, OFF, ON, and CHECK. CHECK requires you to
confirm storage of every picture, OFF means you need to go to play mode to
review your shot. I recommend ON, which causes the shot to appear on the
screen for about 2.5 seconds after shooting, just long enough to make sure it's
correctly composed and focused.
MS
- File Naming - The words FILE NAME indicate the file naming
convention setting, which can be either RESET or AUTO. The Olympus uses a
nice system for naming files. The name looks like PMDDNNNN.jpg, where M is
a character representing the month of the year (1 to 9, then A, B, and C), DD
are two digits representing the day, and NNNN is a four digit sequential
number. Now you can see why it's important that the clock be correctly
set. RESET causes the camera to reset the sequential numbering system each
time you format the memory card (or insert a blank card). If you use
RESET, you can easily get two different pictures of the same name on your
laptop. I
recommend using AUTO, wherein the sequential number never resets, thereby
guaranteeing unique file names for all the pictures in a given year.
|
|
|
|
MS
- LCD Brightness - A rounded rectangle with a vertical line on each
side, and a set of growing vertical bars below indicates the LCD brightness
setting. I have found the default setting just about right. A
brighter setting is more visible in bright light, but consumes more battery
power and wears the display light out faster.
MS
- Date and Time - A picture of a clock dial indicates the date and
time setting. Be sure this is properly set or your filenames will be
messed up. You may want to check it each time you dive to ensure that
amnesia hasn't occurred.
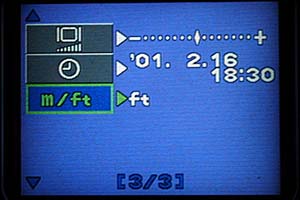
MS
- Metric/English - The words m/ft indicates the focus units setting,
which can be either feet or meters depending on which century you were born.
This ends the discussion of
the MODE SETUP menu.
|
|
|
|
Resolution
- A solid triangle changing on the right into dots indicates the picture
resolution setting. Your choices are TIFF, SHQ, HQ, SQ1, and SQ2. I
recommend HQ as the optimum tradeoff between memory size and quality. To
my eye, the compression artifacts at HQ are barely visible if at all,
particularly on any real underwater subject. In a 64MB card, HQ allows
close to 100 pictures, which is barely adequate. Going up to SHQ reduces
this picture count to around 40, not much better than a roll of 35mm film.
Some would argue that this should be enough because you can delete your bad
shots, but while you're messing with that, I'll be out taking more
pictures! You can only get about six TIFF images on a 64MB card, clearly
too few. |
|
|
|
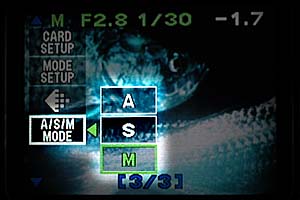
Aperture,
Shutter or Manual - The words A/S/M MODE indicate the mode used when
the power/mode dial is set to A/S/M. I recommend shooting in M (manual)
mode, but you may sometimes find the other modes useful. |
Optics
Lens
Ports - There will be three optional lens ports available for the
Tetra. The standard flat port does not modify the optics of the C3030
lens. There will also be a wide angle port and an macro port. I was
able to briefly test a loaner unit of the wide angle port (which is currently in
production) and a prototype of the macro port.
With
the Flat Port - The flat port gives a 35mm equivalent focal length of
32mm to 96mm over the 3x zoom range. The lens speed is F/2.8, and this
value is maintained throughout the zoom range.
I find the 32mm wide angle
setting usable for distance shots, though of course I'd prefer a MUCH wider
angle lens. The modest telephoto settings are useful for fish pictures;
the extreme telephoto end of the zoom range isn't terribly useful underwater.
In macro mode, the closest
you can focus is about 6" with the zoom at 32mm (wide angle). This
gives a 35mm equivalent frame to film ratio of 2.8 : 1, or in other words a
frame of about 4" x 3". Zoomed to 96mm (full
telephoto), you can focus as close as 12", giving a 1.75 : 1 ratio or a
frame of 2.5" x 1.6". The
optimum zoom setting for maximum magnification seems to be about 85mm, where a
9" focus can be achieved giving a ratio of 1.6 : 1 which is a frame of
2.25" x 1.5". While it's no where near as fabulous as the
Coolpix for macro work, it's still quite usable.
Macro
Port - Light and Motion's "achromatic" macro port modifies
the optics to achieve about twice the magnification available with the flat port.
I measured the ratio at 1 : 1.15, giving a frame size of 1.25" x
0.8". This is achieved with the zoom at 96mm (telephoto), and the nearest focus
distance of 7".
The
problem with the macro port, of course, is that you can't change back during a
dive. When the zoom is at the telephoto end, you can only focus out to
about 11" away, and the frame size is still less than 2" x
1.3". As you zoom towards wide angle, the lens starts to vignette,
but you can push things to about a 6" x 4" frame at 15"
distance. This gives you considerably more flexibility than with a Nikonos
framer, but nowhere near as nifty as the Coolpix.
Wide
Angle Port - Light and Motion's Wide Angle port for the Tetra
modifies the optics to optimize for distance shots. I'd estimate the wide
angle port gives the 35mm equivalent of about an 18mm lens, and this is a
substantial improvement over the limits of the 32mm unmodified optics.
Unfortunately, like the macro port, use of the wide angle port limits your
flexibility. Even in macro mode, the closest you can focus is about
15", and at the telephoto setting this is a 6" x 4" frame.
So you lose any macro capability with this port.
Chromatic
Aberration - The C3030 lens system suffers from a significant optical
aberration. It results is colored fringes near edges of high contrast,
which are worst near the edges of the picture. I'm told that this is not
the result of poor lens crafting, in fact Olympus has worked very hard to
manufacture particularly good lenses to minimize the problem. Instead,
it's apparently the consequence of the camera's high resolution using a
physically small (and thus inexpensive) CCD chip.
I've created a simple setup
to demonstrate the problem, and I've concluded that the problem exists to about
the same degree whether underwater or in air, and with all the various Tetra
ports. The section below shows the test photos and explains what you're
seeing and my conclusions.
|

|
|
A full frame photo of my demonstration setup. It's a sheet of
dark gray construction paper with holes punched around the edges, placed
over a sheet of plain white paper. Not shown in this case is a
business card I place in the center to give the auto-focus processor
some data. The light source is the internal camera strobe.
The idea is that the very sharp edges of the holes should produce
either black, white, or (in the case where the edge crosses a pixel)
pure gray pixels. There should be no color in the image at
all. Of course, the white balance could be off, so an overall cast
won't indicate any problem. But, as we'll see, if there's
chromatic aberration, the white light will refract slightly and tend to
create a purple fringe on one side of the hole and a green fringe on the
opposite side.
|
|

|
|
Zooming in on the upper left hole (chosen because it's the farthest
from the center of the image), you can see the limits of the camera's
definition. In this case, the camera is my Fuji S-1, which has a
very large (1" wide) CCD with 3.3M pixels. The lens is a
Sigma 28-300mm ultrazoom, so we're not looking through particularly high
quality optics. Note in this case that the image is still purely
gray, with no hint of colors. |
|

|
|
Even when I adjust the contrast to an extreme level using Photoshop,
there's still no trace of color around the fringes. This is an
example of the complete lack of chromatic aberration in the Fuji S-1,
even with a relatively inexpensive lens. I attribute this largely
to the expensive, large, high quality CCD in the S-1. |
|
|
|
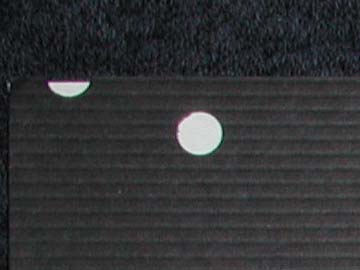
Here's a 360 x 270 pixel portion of the original test image from the
C3030 test performed in air, outside the Tetra housing. This test
is at nominal zoom, F11, but my experience is that neither the F-stop
nor the focal length have substantial effect on the magnitude of the
phenomenon.
You can clearly see the purple and green fringes on the opposite
sides of the hole.
|
|

|
|
Here's a contrast enhanced and 4X enlarged version of the above
image. This is useful for identifying the magnitude of the
problem. Just about all prosumer digital cameras above 2.2M pixel
exhibit the problem, but the C3030 is perhaps the worst offender. |
|

|
|
Here's a contrast enhanced and 4X enlarged version of the test taken
through the Tetra flat port underwater. The water has shifted the
color balance somewhat, but the magnitude of the effect is similar. |
|

|
|
For comparison, here's the same test (underwater) as above for the
Coolpix 990. You can see it's of similar magnitude to the
C3030. Note, however, that the ring of color is more even in
thickness. |
|
|
|
Is this effect something to be concerned about? I'm afraid I
have to say yes. At left is a photo I took in the Caymans.
Even at this size, you can see a bit of purple on the bubbles near the
top.
I should note that this is the only photo I've taken where the
chromatic aberration has been anywhere near this obvious. But you
need to watch for it whenever there is a sharp, high contrast edge near
the side of the image.
|
|

|
|
Here's a 360 x 270 portion of the original image (no
enhancement). You can clearly see the characteristic purple and
cyan fringing of the C3030 chromatic aberration problem. I don't
think this is just some funny refraction from the bubbles themselves. |
Sample
Photos
Well, I've said all I have
to say about the Tetra and the Olympus 3030 underwater. Of course the final
test is the photos you can take. Below are a handful of pictures I shot in
my first two months owning my Tetra. All were shot using the flat
port. Locations are Carmel, Monterey, and Grand Cayman. Click on the
photo to get the full resolution (2048x1535) version. All have been
touched up by Photoshop, but I've done nothing gross. I think (and I hope
you'll agree) that in conclusion, even though there are a number of
shortcomings, one can still take some pretty fine pictures with the Tetra/C3030
system.
 |
|
|
|
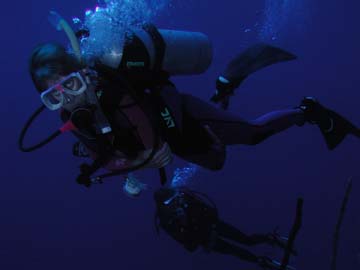
"Above and Below" shot at Grand Cayman
11/30/00 |
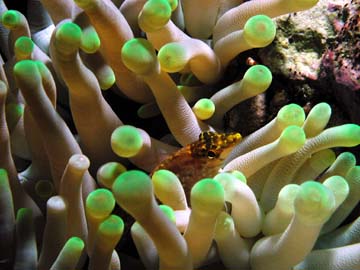
"In the Anemone Forest" shot at Grand Cayman
11/29/00 |
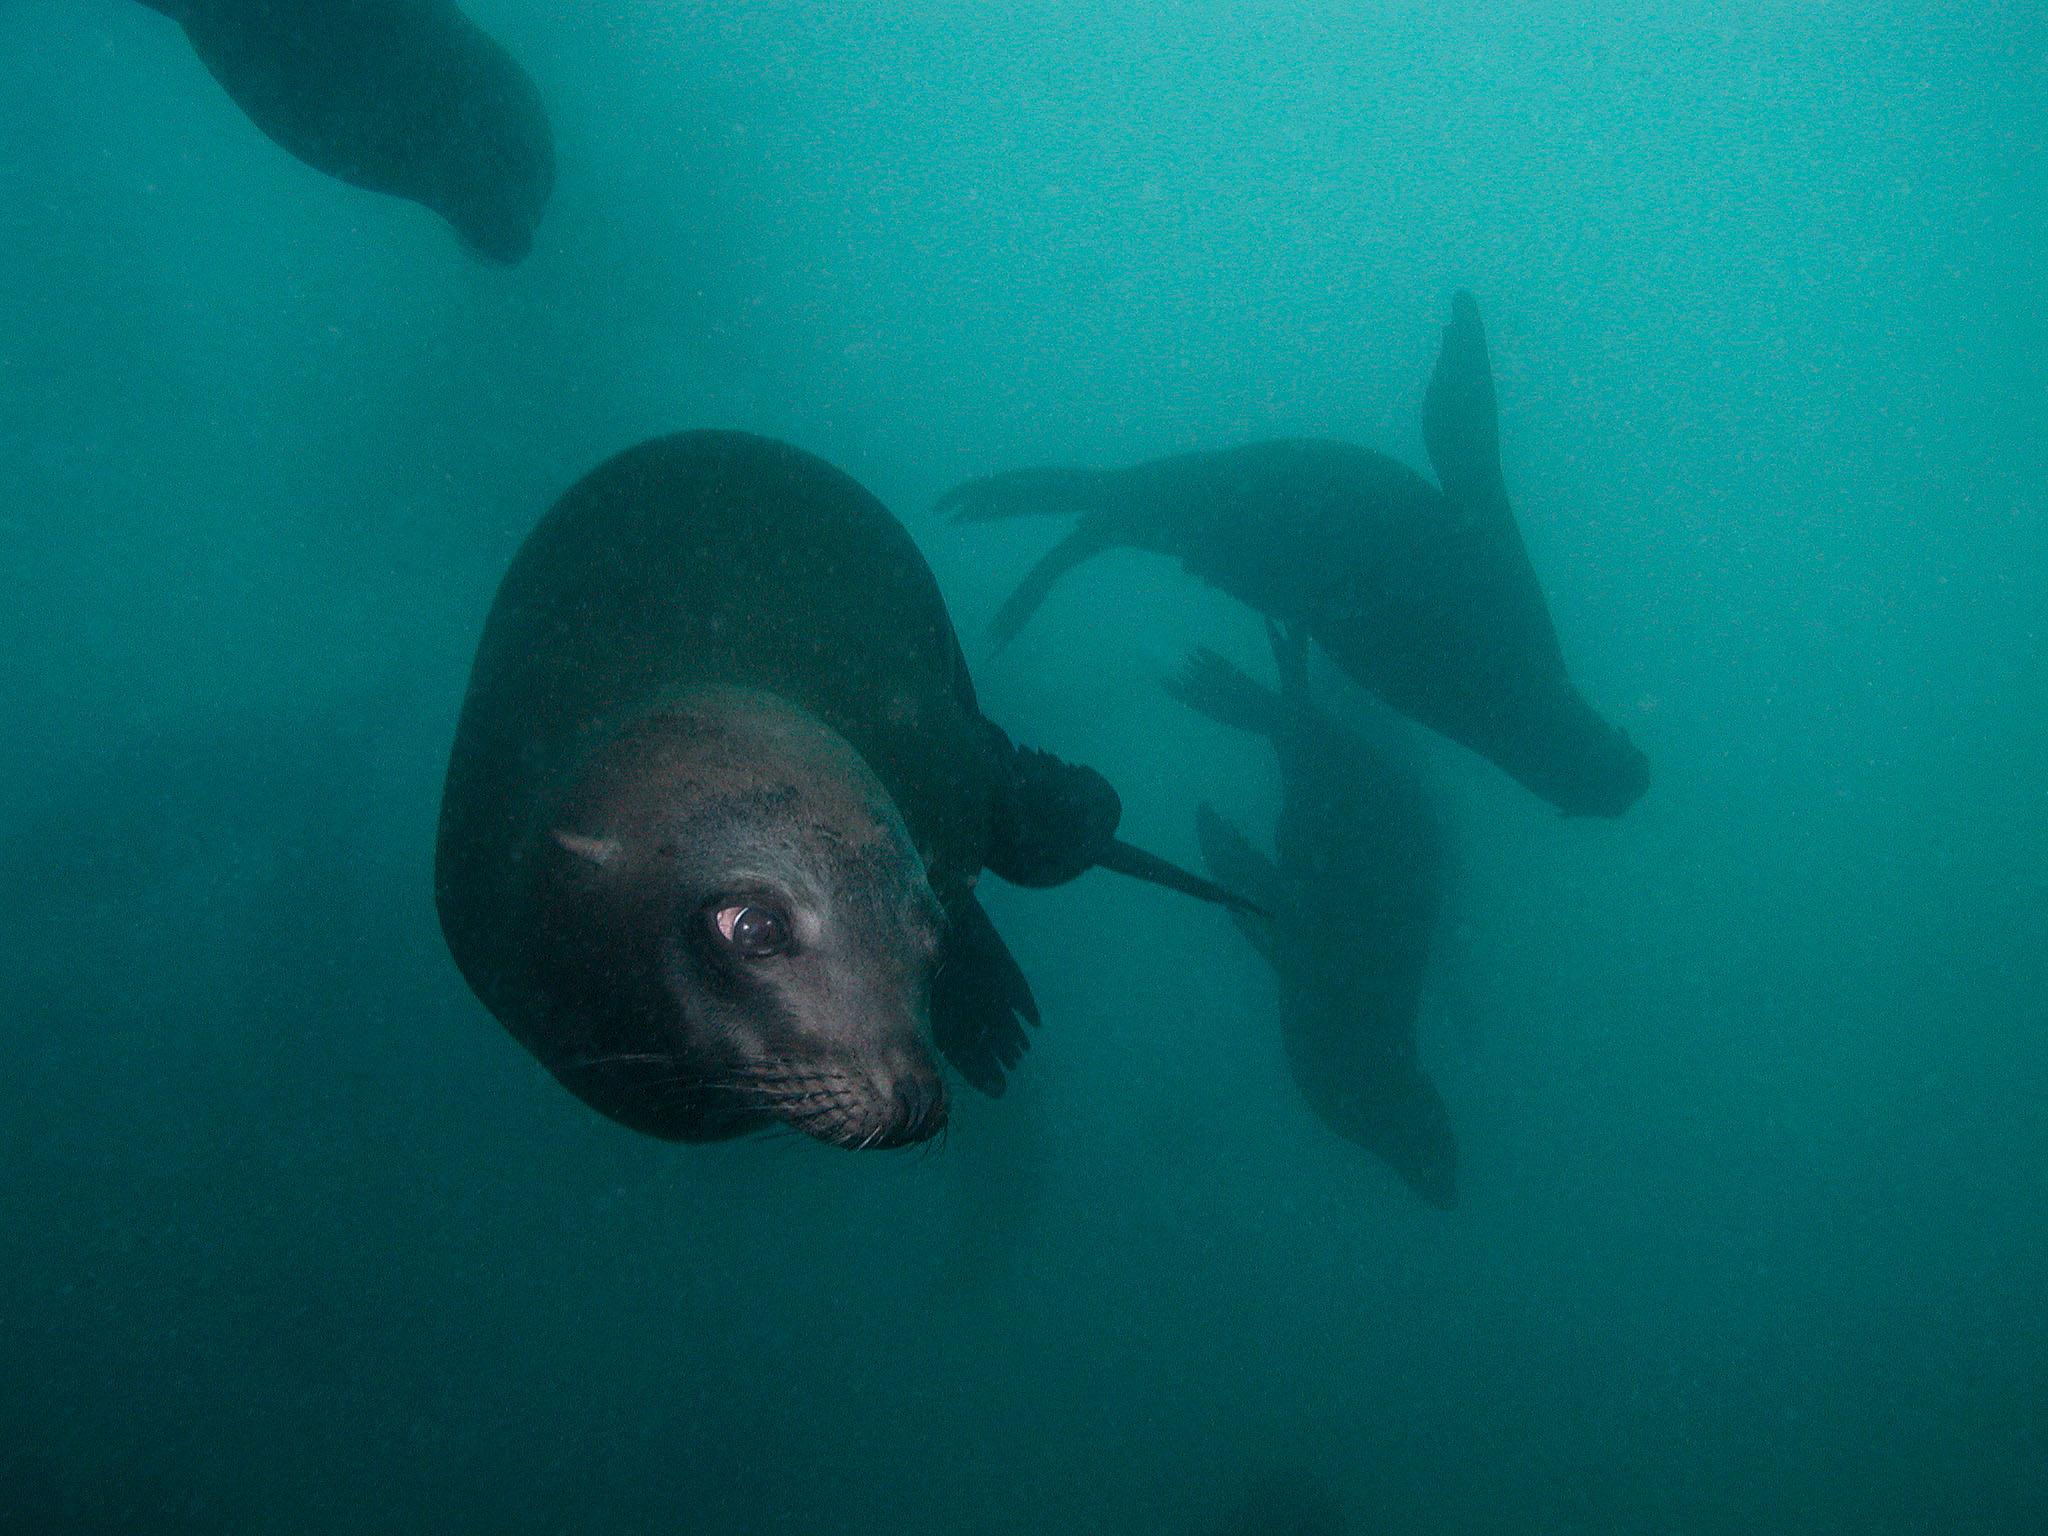
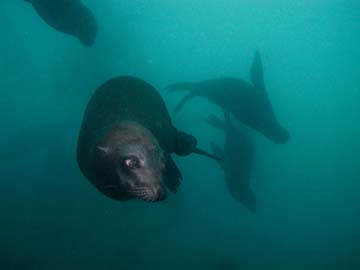
"Sea Lion Shadow-Play" shot in Monterey
12/21/00 |
|
|

|
|
|
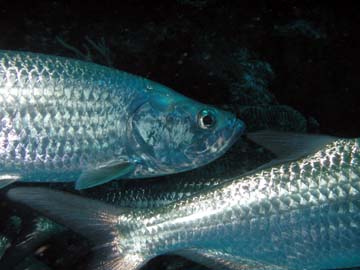
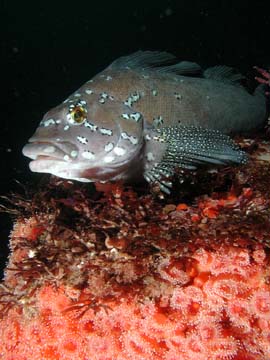
"Knights" shot at Grand Cayman 11/30/00 |
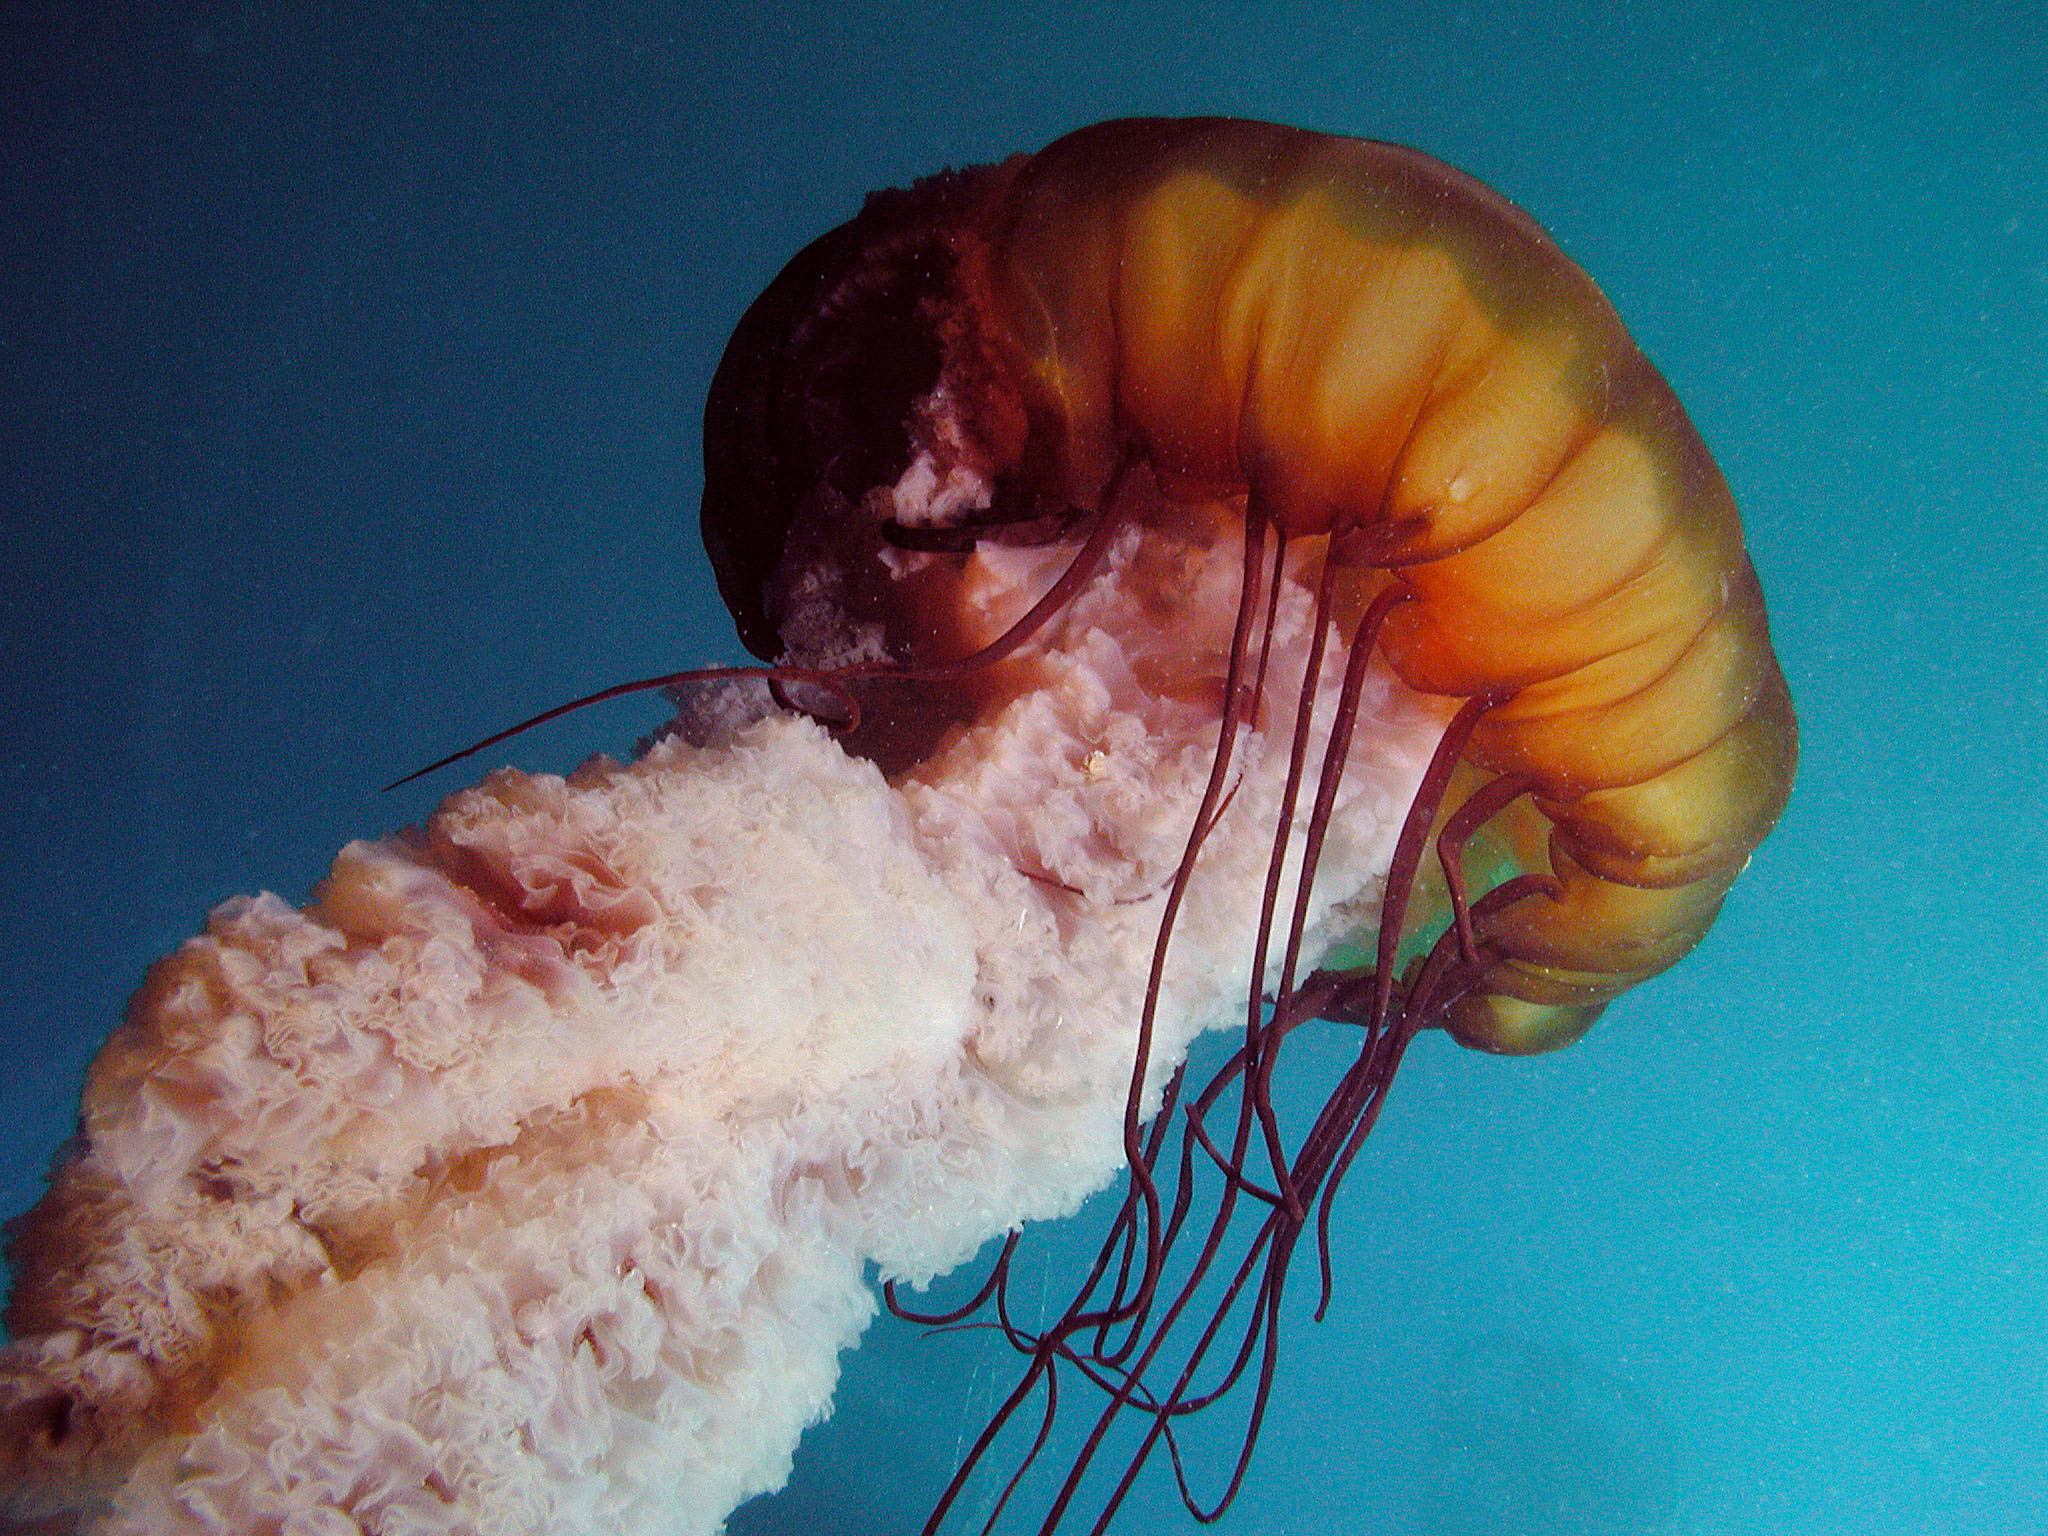
"Jelly" shot in Monterey 12/27/00 |
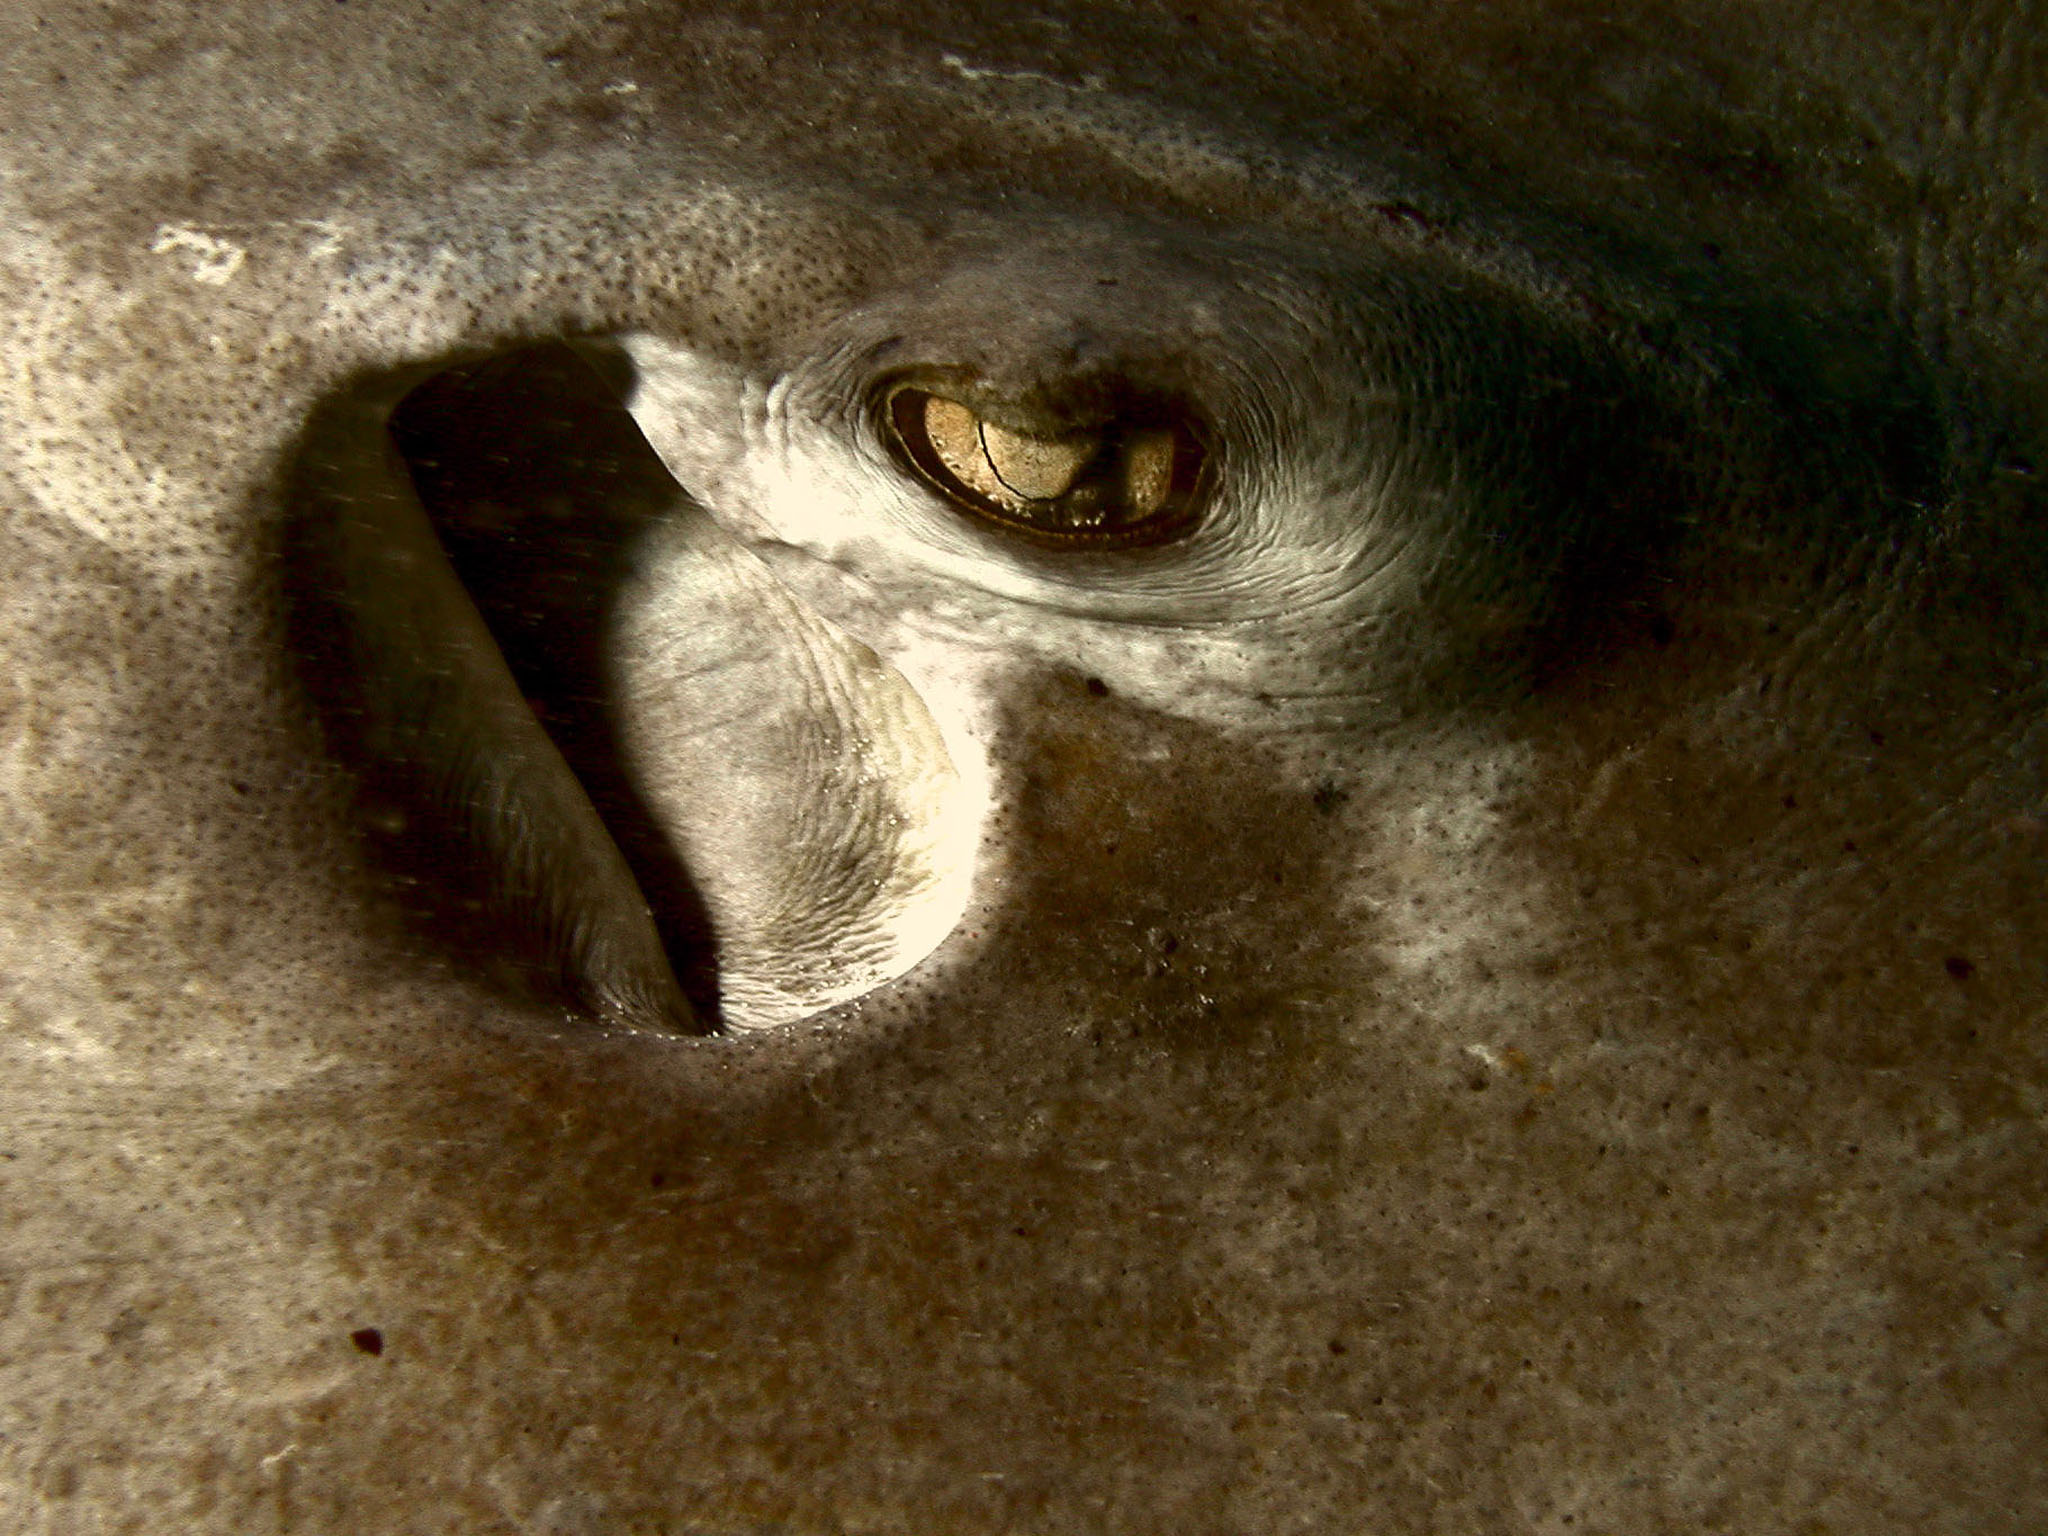
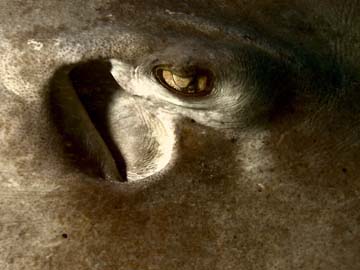
"Eye of the Stingray" shot in Grand Cayman
12/1/00 |
|
|
|
|
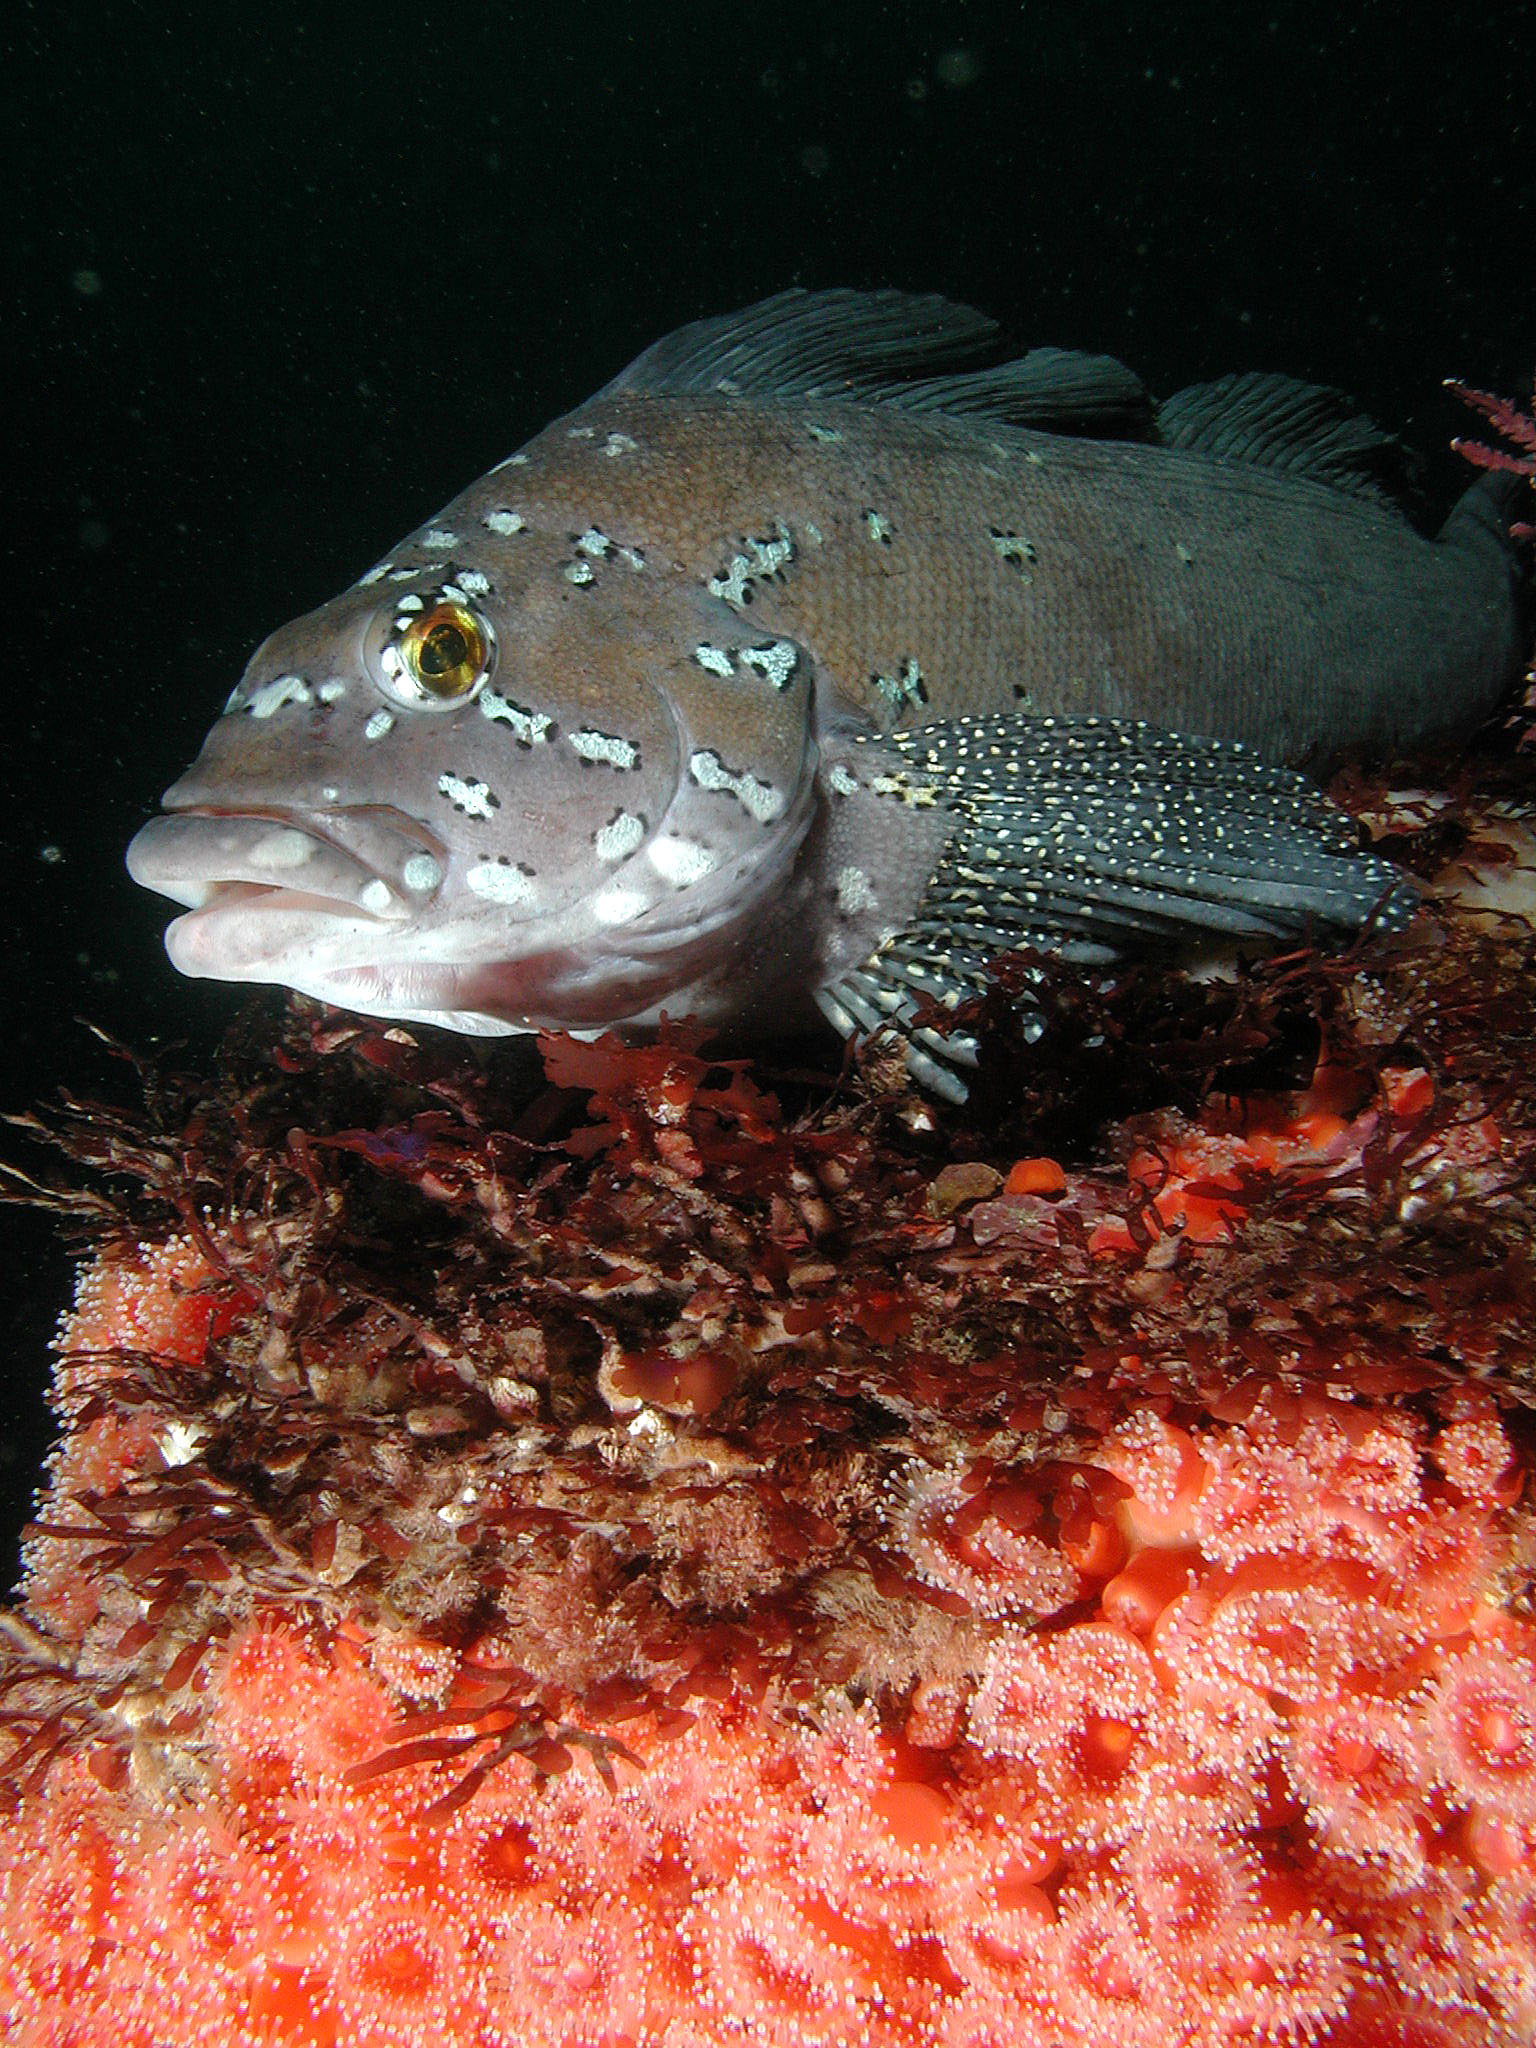
"Nesting" shot in Monterey 12/21/00 |
|